Recently, I was tasked with a Product Page design in Replo where when you select a variant or option, the images in the slider would change to those variant specific images.
In this post, I’m going through the exact workflow of how I achieved it. I’ll explain how you can go about creating a swatch, connecting your product, assigning images per variant, and binding that swatch to your slider component. We’ll also cover best practices, common pitfalls, and quick fixes.
Goal: When a user selects a variant (e.g., “Black” vs. “Gray”), the product gallery updates to show that variant’s images only.
Why it helps:
- Reduces confusion and returns (customers see exactly what they’re buying).
- Improves engagement (people love seeing their exact selection).
- Feels premium and intentional—especially on mobile.
How It Works in Replo
There are 2 ways you can achieve this functionality in Replo: through swatches or through Shopify product images. Here, I’ll explain both the methods with easy, step by step guide about how to implement it.
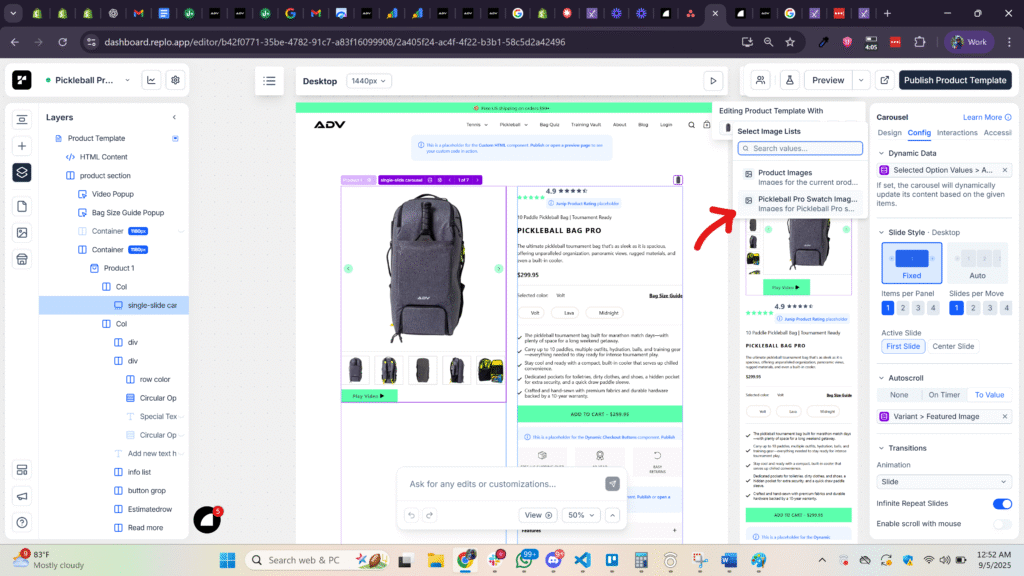
Method 1: Configure Variant-Specific Images using Swatches in Replo
Replo supports “Swatches” that you bind to a product and its variants. Each variant in the swatch can have its own image set. Then, on your page, you attach that swatch to your slider component (e.g., Single Slide Carousel, Right Carousel, Mac Stack Slider). When the variant changes, the slider pulls the images from the matching variant in the swatch—done.
1) Place and select your slider component
- In Replo, click your slider (e.g., Single Slide Carousel / Mac Stack slider).
- Open the Data (or Config) tab for this component. You’ll wire it to a swatch in a moment.
2) Create a swatch for this product
Here’s how you can create a swatch for the product.
- Navigate to the Variants / Option List area in Replo (the UI where you manage variant-related assets).
- Click the + to create a new Swatch.
- Name your swatch clearly—using the product name is a great convention (e.g., “Matrix Lock 10 – Color Swatch”).
- Choose “By Variant” as the swatch type.
- Connect the product. Once connected, Replo pulls all the product’s variants (e.g., Black, Gray, Green).
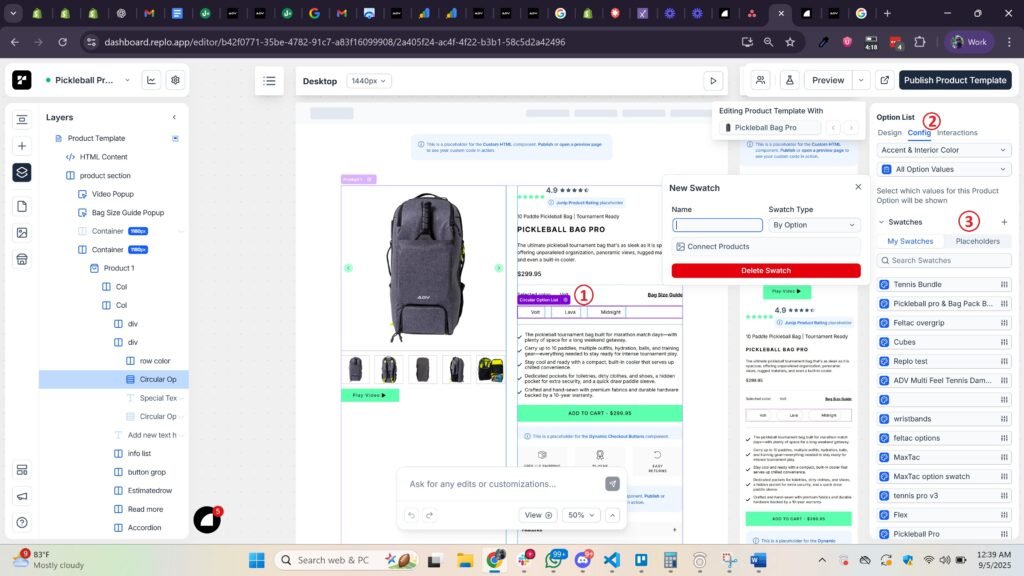
Tip: Using the product name in the swatch makes it easy to find and avoids mixing assets across different products.
3) Assign images to each variant
For each variant listed in your swatch:
- Set Swatch Color or Swatch Image if you’re showing a chip/button.
- In the Images section, add all images that apply to that variant only.
- Repeat for every variant.
Pro move: Keep image sets consistent. If Black has 5 images showing front, side, details, etc., try to mirror that order across other colors for a consistent UX.
4) Bind the swatch to your slider
- Return to your slider component on the page.
- In the Data/Config panel, select the Swatch you just created.
- Ensure the slider is set to pull images from the currently selected variant via that swatch.
That’s it. When a shopper changes the variant, the slider updates to the correct, variant-specific images.
Managing and Reordering Images Later
Need to change image order or swap a shot?
- Open the Swatch again (for that product).
- Go to the specific variant, then drag to reorder images, add new ones, or remove old ones.
- Your slider will reflect the new order automatically—no change needed on the page component.
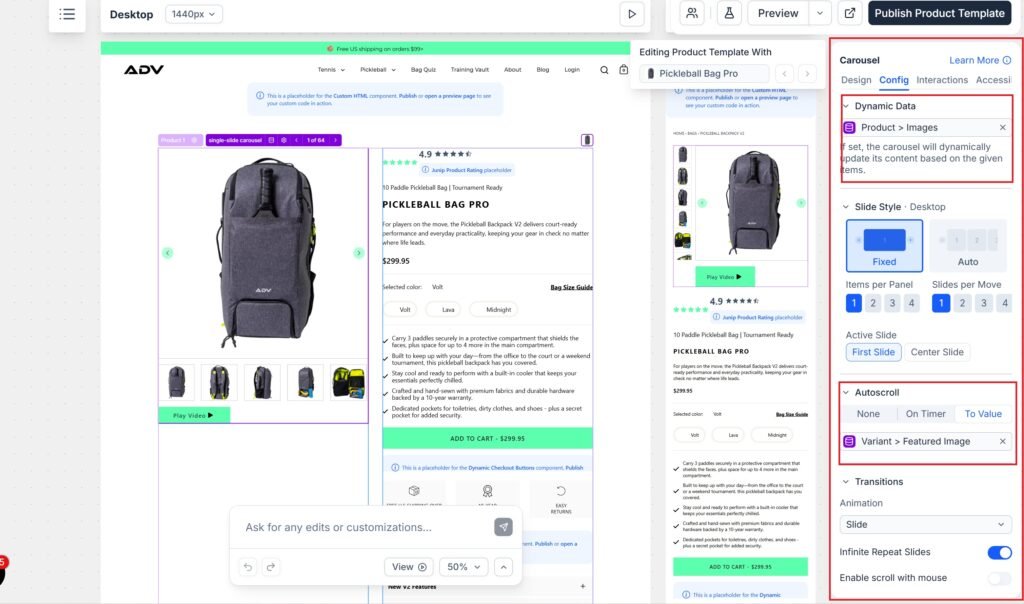
Method 2: Auto Scroll to Variant Featured Image
Another more dynamic way you can show variant specific images in the slider component on a product page in Replo is by adding images in the right order in Shopify and then using Auto Scroll to Variant Featured Image setting. Here, I have explained it in more detail:
How It Works
All media lives in the Shopify product gallery—not split by variant. In Shopify, you assign a featured image to each variant. Your Replo slider (e.g., Single Slide, Mac Stack) is connected to the product’s gallery. When the shopper changes the variant, the slider auto-scrolls to the variant’s featured image, which acts like a bookmark within the gallery. The rest of the images remain visible as you continue scrolling.
Because images for all variants live in one continuous strip, ordering matters. If you stack all “Lava” images together (front, back, detail, lifestyle), the experience feels coherent: select Lava → the slider jumps to the Lava featured image → the next few swipes feel like a Lava-only gallery. After those, the “Midnight” images will begin, and so on.
Step by Step Implementation
First, make sure every variant has a featured image in Shopify. This is critical—the slider relies on that image as the variant’s “entry point.” If a variant is missing a featured image, the jump won’t be reliable.

Next, organize the product media order in Shopify. Group images by variant in the sequence you want them consumed. For example, place all Lava shots together (01–05), followed by all Midnight shots (01–05). Drag and drop until each block is clean and contiguous.
In Replo, place your slider component and bind it to the product’s images (not a swatch). In the Auto scroll setting, set the slider to Auto Scroll to Variant Featured Image.
Finally, test it like a shopper. Select “Lava” and confirm the slider jumps to the Lava featured image. Swipe through and make sure the next few images all belong to Lava, with Midnight only appearing after the Lava set finishes. If something feels off, it’s usually the media order or a missing variant featured image.
Maintenance Tips
When you add new shots or rearrange a set, always fix the order in Shopify’s product media. Keep naming consistent (e.g., bag-lava-01.jpg, bag-lava-02.jpg) and maintain the same shot sequence across colors so the experience feels premium and predictable. If you change which image should be the first impression for a variant, update the variant’s featured image accordingly.
Trade-Offs vs. Replo Swatches
The auto-scroll method is fast to set up and easy to reason about—great for smaller catalogs or when you need to launch quickly. However, the gallery is not truly filtered; it’s one long strip, so other variants’ images will still appear as the user keeps swiping. If you want strict, variant-only galleries (no bleed from other colors) or per-variant curation directly in Replo, Swatches give you that precise control.
Swatches also scale better when your catalog grows or your merchandising needs become more complex. You can assign images directly to each variant inside Replo, reorder without touching Shopify media, and guarantee that the slider only pulls the current variant’s set.
Replo also recommends loading images from the Replo CDN instead of Shopify CDN. This ensures faster load times. So if you’re building pages in Replo, you can leverage the Replo CDN and add the swatches to load images from Replo.
Best Practices for a Polished Experience
1) Keep file names and alt text organized
- Use predictable naming (e.g.,
matrix-lock10-black-01.jpg,matrix-lock10-black-02.jpg). - Add alt text for accessibility and SEO.
2) Match aspect ratios
- Use consistent aspect ratios across variants to avoid layout shifts (e.g., all 1:1 or all 4:5).
3) Optimize for speed
- Upload images at sensible dimensions (don’t overdo 4k unless necessary).
- Let Shopify’s CDN handle responsive delivery; avoid gargantuan files.
4) Handle multi-option products cleanly
- If you have multiple options (e.g., Color + Size), attach images to the option that visually changes (usually Color).
- Keep your variant names tidy so mapping is unambiguous.
5) Set a strong default
- Make sure your default selected variant has a complete image set, so above-the-fold looks great on first load.
Maintenance Tips
- New color launch? Add the variant in Shopify, then open your swatch and assign its new image set.
- Seasonal images? Swap them in the swatch; your slider updates automatically.
- Bulk changes? Keep a simple checklist:
- Add images to Shopify library
- Update swatch per variant
- Validate order in preview
- QA on mobile
Workflow Recap
- Add a slider to your Replo page (e.g., Single Slide, Right Carousel, or Mac Stack).
- Create a swatch (By Variant) and connect the product.
- Per variant, add the correct images in the swatch.
- Bind the swatch to your slider in the Data/Config panel.
- Test variant switching to confirm the gallery updates.
With this setup, you’ll deliver a gallery that feels intuitive and tailored—exactly what shoppers expect when exploring different colors and styles.
Need to enhance your store’s looks? Hire me for Shopify design and development.